Choice of color to wrap around the cork for the body can make us think of a whole range of animals; black and white may become a panda or zebra; brown may become a bear, hedge hog or beaver; Grey may become an elephant.
The techniques we use with cork animals can easily be applied to toilet paper rolls only on a larger scale. For a penguin's eyes fit to the scale of a empty roll, instead of a hole punch to form the circle a small lid might be traced.
So here's this sweet little cork bunny craft.
What's fun about imagination is you can chose any color for your animal. We chose pink, but you don't have to. You can make big eyes and round the top of the ears if you'd like. Feel free to create.
 |
Cork Bunny Craft Materials |
- White printer paper
- Construction paper, your choice of color--whatever color you'd like your bunny to be--we chose pink
- not toxic washable glue like Elmer's White or Clear
- Clear tape like Scotch
- Hole punch
- Scissors, kid safe
- Black marker, non-toxic, washable
- Ruler
- Natural wine cork
 |
Natural Wine Cork |
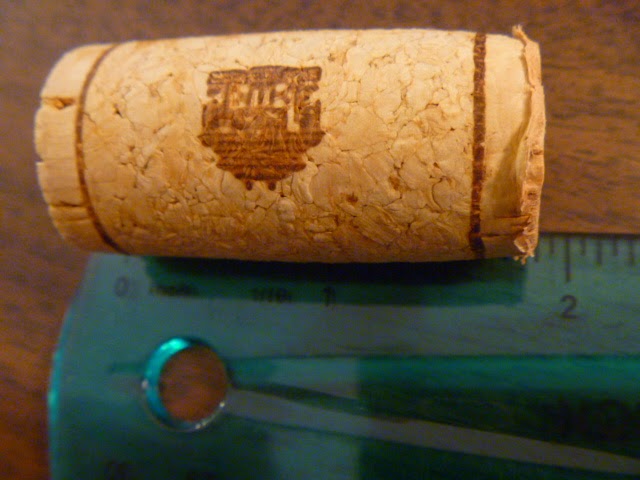 |
1 3/4 inches long |
 |
4 1/2 centimeters long |
These measurements of the cork are approximate.
 |
15/16 inches in diameter |
 |
2 4/10 centimeters in diameter |
 |
Bunny body 1 --width of strip |
You can see we've chosen to make a pink bunny.
We laid the cork down on the pink paper and marked the paper on a point a little longer then the cork because when it is wound around the cork, it will make a stable base and compensate for the natural cork's irregularities. We marked the strip here for a width of about 2 1/16 inches or 5 3/10 centimeters.
 |
Bunny body 2 --length of strip |
Here we made it about 4 1/2 inches or 10 7/10 centimeters long. It turned out to be a bit too long, but that's okay.
 |
Bunny body 3 |
3. Roll this strip around the cork.
Since the cork's diameter may be slightly different at each end, sometimes it's helpful to line the edge of the paper up with a word or emblem across the cork.
Roll loosely, so you can adjust it around the cork, so the bunny will be able to stand up without falling over.
 |
Bunny body 4 |
4. Tape at the back.
 |
Ears and paws |
5. Fold a small square of colored paper (used for the body) in half to cut out the ears and paws.
Starting at the edge opposite the fold, cut a long thin rectangle for the ears.
 |
Ears and paws 2 |
6. Since the paper was folded, you should have two rectangles. Mine are about 2 1/2 inches or 6 1/4 centimeters long and 1/4 inch or 7/10 centimeters wide.
These ears turned out to be too long, but it is easier to trim them down while assembling the bunny than to lengthen them.
 |
Ears and paws 3 |
7. At one end of the long rectangles, cut the corners off for the tops of the ears.
 |
Ears and paws 4 |
8. Snip off the bottom of the ears, about 1/4 inch or 1/2 centimeter, for the paws.
This will give you two mini rectangles to use for the paws.
 |
Ears and paws 5 |
9. Round off the bottom corners of the little rectangles for the paws.
You may not be able to clearly see from the picture, but there are two little paws in it, one on top of the other.
 |
Ears and paws 6 |
10. Fold back the bottom 1/2 inch or 1 centimeter of the ears.
You'll use this little folded back tail to attach the ears to the top of the head later.
 |
Inside of ears |
11. Use the same steps for the inside of the ears as you did for the outside.
Except, eliminate steps for paws. use white paper and keep in mind they should be smaller to fit inside the ears.
 |
Inside of ears 2 |
12. Glue the inside of the ears onto the ears.
Here's where a toothpick or popsicle stick might come in handy to apply the glue. I squeezed from the bottle and got way too much as you can see in the picture.
Put the ears aside to dry.
 |
Bunny eyes |
13. Punch the eyes out of white paper with a hole punch.
 |
Bunny belly |
14. From the white paper, cut a rectangle about 1 inch or 2 2/10 centimeters by 1/2 inch or 1 2/10 centimeters.
 |
Bunny face and belly |
15. Glue on the eyes, the belly, and then the paws in that order.
Set aside to let dry.
 |
Top of bunny head |
16. Carefully trace around the top of the head without touching the face you just glued on.
Perhaps, it would be easier to trace the top of the head before gluing on the face :) If you trace the top first, take note of which end you traced because the two ends may be different sizes.
 |
Top of bunny head 2 |
17. Cut out the circle you traced. Notice the pencil marks at the edge of the circle. Later when putting the bunny together, make sure they are underneath so they can't be seen.
 |
Top of bunny head 3 |
18. Glue on top of the head.
After it the glue has dried, attach the ears.
Let the glue dry.
 |
Bunny face |
19. When all the glue is dry, draw the face on with a marker.
No comments:
Post a Comment
Note: Only a member of this blog may post a comment.