Monday, April 7, 2014

Easy Watercolor Notepaper and Envelope

Easy Watercolor Envelope and Notepaper


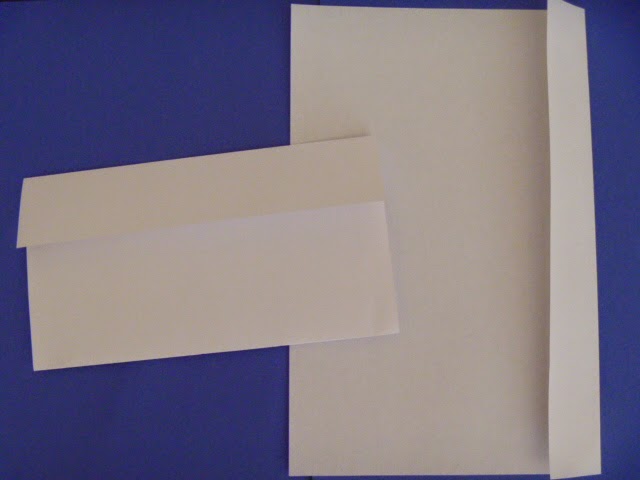
1. Fold an 8 1/2" x 11" sheet of white paper up from the bottom about four and a half inches for the envelope.
2. Fold the flap down about two inches.


3. Using a second sheet of white paper, fold the edge over about one and a half inch.

4. Dampen the crease with a paintbrush dipped in water.


5. Tear off the edge.


6. With crayons, decorate the flap of the envelope and the top of the notepaper.

7. Unfold the envelope making sure the flap decoration is on the top (It should be up-side-down).
  • Put the envelope and notepaper next to each other.


  • 8. Using watercolors, paint  any patterns you'd like on the envelope and notepaper.
  • For light colors, use a very wet paintbrush.
  • For matching envelope and notepaper, make the pattens similar.

Let dry.
~~~~~~~~~~~~~~


9. After the paint is dry, turn the envelope over.

10. Apply glue to the side edges of the bottom of the envelope with a clean damp paintbrush.
  • I used Tacky glue since it isn't runny.
  • Make sure to wash out the paintbrush thoroughly with warm water after applying the glue.

11. Fold up the bottom portion of the envelope with glue on the edges and smooth over the edges to securely glue them together.

12. Fold the notepaper in thirds.
  • Start by folding up the bottom third of the notepaper.


13. Finish folding the notepaper by turning under the bottom portion as if folding a fan.
  • The top decoration should showing.


14. Check that the notepaper fits in the envelope.


~~~~~~~~~~~~~~~
15. After writing a note or drawing pictures on the notepaper, put it in the envelope and seal the envelope with a little glue or a sticker.
  • Deliver this letter by hand because this envelope is too delicate to go through the mail.


Seal the envelope with a dab of glue or a sticker

Friday, April 4, 2014

Watercolor Note Paper and Envelope

Watercolor Envelope and Note Paper
Even though the envelope isn't strong enough to be sent through the snail mail, it's fun to use to enclose your notes to family and friends for birthdays and other occasions.


1. Start the square for the envelope by folding up one corner of an 8 1/2" x 11" white sheet of printer paper.


2. Use the end of a paint brush to smooth over the crease

3. Put a little water along the crease with the paint brush.

4. Tear off the extra piece.

5. Now you have a square for the envelope.

6. Fold over the opposite corner about one forth inch short of the untorn edge.

7. Fold over this one forth inch extra and smooth crease.

8. Apply water to crease.
9. Tear off the thin strip and save it for later.


10. Open the corners to a diamond shape with the torn edges pointing up.

11. Fold the two side corners in to meet in the middle.
12. Fold the bottom corner up about an inch past the middle.

13. Crease the extra inch of corner and dampen the crease. 

14. Tear off the extra corner and save for later.

15. You are almost finished folding the envelope.

16. Bring the top corner down to close.
  • Set the envelope aside while you create two pieces of note paper.


17. Fold a second sheet of white paper in half.


18. Dampen the crease and tear in half.
19. Fold one of the halves in half again and dampen the crease.


20. Tear in half again and you'll have two pieces of note paper one forth the size of the original white sheet.


Ready to Paint


21. Unfold the envelope, turn it over, and set it next to the scraps and two piece of note paper.


22. Using a lot of water so the colors aren't too dark, paint similar designs on the envelope, scraps, and note paper. 


23. Keep a paper towel under your container of water, so you can wipe your brush on it. 
  • The painted paper towel will be used to decorate your note paper.


Let Dry!


24. After the paint is dry, cut two pieces of parchment paper about the size of the note paper.

25. Put one piece of parchment paper inside of the envelope.
  • The parchment paper keeps the glue from sticking the front of the envelope to the back.


26. Apply white glue with a paint brush along the sides and bottom of the envelope. You'll have a guesstimate a little where the glue if needed.

27. After the bottom of the envelope is glued together, use the second piece of parchment paper to tuck under the flap.
  • Now you can decide which closure you'd like. The strip or....


the corner.


28. After you choose your closure, fold the parchment paper up just far enough so you can mark it with a pen to indicate where to glue the closure on.
  • Glue on closure.


29. Cut two shapes of your choice out of the painted paper towel.

30. Glue these shapes on to the top of the note paper.


Note paper should fit in envelope without folding.