 |
Wine Cork Penguin |
 |
Materials for wine cork penguin |
- Wine cork
- Black construction paper
- White printer paper
- Orange construction paper
- Pencil
- Glue
- Clear tape
- Ruler
- Scissors
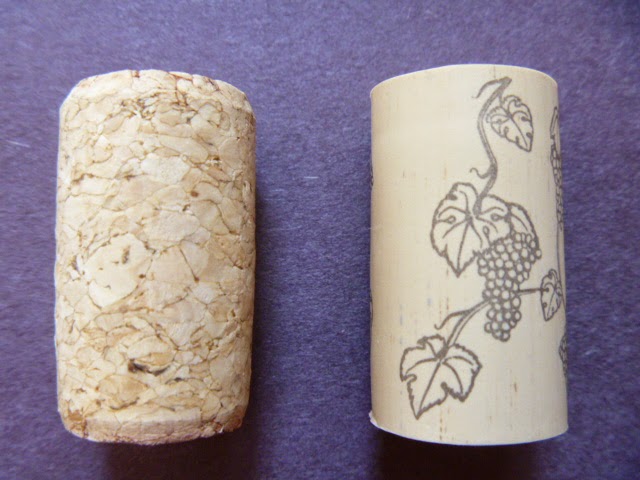 |
Two wine corks: natural and synthetic |
You can use either wine cork to create this little penguin, but if you would like one that stands up, a synthetic cork usually has a flatter bottom. So the penguin can stand wherever you place him, and create your own arctic scene.
You could also add an ornament hanger to the top and use the penguin to decorate your Christmas tree. In this case, using a natural cork is fine.
First I'll give instructions for cutting out all the pieces then put them all together.
Creating the shapes needed for the penguin
 |
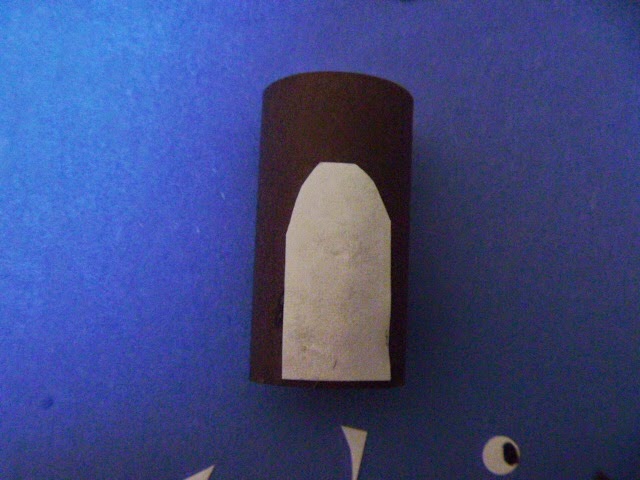
Penguin body |
1. Cut a strip of black construction paper to wrap the cork with for the body--for this 7/8" diameter cork, I used a 4" x 2" rectangle.
 |
Top of penguin head |
2. On the black construction paper, trace around the cork for the top of the head.
 |
Circle for top of head |
3. Cut out the traced circle.
 |
Penguin tummy |
4. Using white paper, cut out a 1" x 1/2" rectangle for the tummy.
 |
Penguin tummy-2 |
5. Cut off the top two corners of the white rectangle to round the top of the tummy.
 |
Penguin wings |
6. Trace the tummy shape onto black construction paper for the wings.
Note: Keep the white tummy piece with the same side up for both wings in case the edges get pencil marks on them. Then when
gluing on the tummy, make sure any pencil marks are on the
back. As you can see from my penguin, this is hindsight
wisdom.
 |
Penguin wings-2 |
7. After cutting out the two black wings, place the flat ends up. The flat ends are the tops of the wings. Whereas, the flat end of the tummy is the bottom.
 |
Penguin wings-3 |
8. Trim up both sides of each wing to make the tops of the wings narrower than the bottoms.
 |
Penguin nose |
9. Cut a very small triangle from orange construction paper for the nose.
 |
Penguin eyes |
10. Use a hole punch for the white circles of the eyes.
 |
Penguin eyes-2 |
11. Use a black marker for the eye balls.
Putting the penguin together
 |
Attaching the penguin body |
12. Roll the black strip around the cork and tape together in back.
 |
Gluing on the tummy |
13. Glue tummy on front.
 |
Gluing on face |
14. Glue on eyes and nose by putting three little dots of glue above the tummy. The two for the eyes, across from each other, and the third for the nose at the top of the tummy.
Then carefully place one tiny eye then the other, and last the nose on the dot of glue reserved for each.
 |
Gluing on the wings |
15. Glue on the wings; one one each side.
 |
Gluing on the top of the head |
16. Glue on the top of the head.
If you'd like the penguin to be a Christmas ornament, poke a hole in the middle of the circle before gluing it on.
Through the small hole, thread a loop of yarn leaving the tails underneath to be included in gluing the top of the penguin head on.
This is your penguin to remind you of refreshing winter breezes in the heat of summer.
Here's the trailer from March of the Penguins. The Wine Cork Penguin Craft was modeled after the Emperor Penguin, but you can see from the trailer, I didn't include some details. Perhaps you'd like to create a more accurate penguin.
We've been watching Wild South America on HuluPlus. The Penguin Shores episode about the Humboldt penguin is amazing, and if you watch it, you'll notice differences in the penguins. Perhaps you would prefer to model your penguin after Humboldt penguins instead of Emperor penguins.