Thursday, April 28, 2011
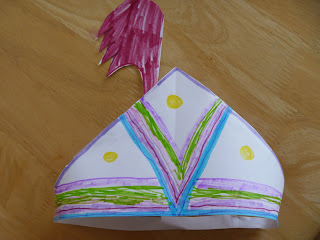
Paper pirate hat
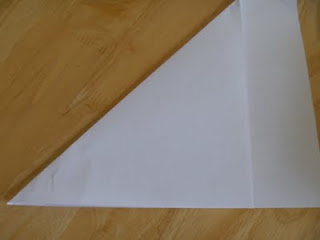
Here's a little pirate hat made with two pieces of 8 x 11 inch paper, crayons, clear tape, and scissors. Fold the paper into a triangle, and trim off the extra edge. Tape the triangle together at the top with clear tape to reenforce the hat and make it stand up straight.
Color the triangle with crayons. Cut a strip of paper from another piece of paper to go around the head of the wearer. Tape the strip to the triangle, so that the hat fits. Color and cut out a feather, and tape it to the hat.
Friday, April 22, 2011
Robot face from TP rolls and candy wrapers
Melted crayons activities
Melting crayons is a great way to recycle small broken pieces at the bottom of the craft box, but do kids really use them for coloring? In my experience, not for long. Would love to hear if your experiences are different!
Since our melted crayons just sit around and get dusty, I was not so thrilled when my daughter suggested to melt some more. But what else were we to do with the little pieces?
After melting the crayons this time, here's some activities and uses we came up with to do with the little circles.
- building blocks
- doll furniture
- paper wieghts
- door hangers
- necklaces
- dinosaur stepping stones
We used an old plastic knife with a rounded cutting edge to whittle the melted crayons into shapes. The heart above was made this way. We used toothpicks to carve designs in the melted crayon circles and shapes.
I used a safety pin to poke a hole in the top of the crayon circles to thread yarn through to make the necklaces and door hangers.
So now I enjoy our little melted crayon circles, I mean, they are pretty and usable.
Here's how we melted the crayons.
1. We put them in cupcake baking pans. (I only use this pan for crafts and not food anymore.)
2. Put in a 200 degree over for 10 minutes. ( I did not preheat the oven.)
3. I took them out of the oven after 10 minutes even though some of the crayons were not completely melted. They were melted on the bottom, and I didn't want to over cook the other crayons.
4. I let them cool for about 20 minutes. When they are cool, them come loose from the sides of the pan almost by themselves. Just try to twirl them around a little.
6. After they are cool, they should come out of the pan pretty easily. The underneath is shiny.
Thursday, April 14, 2011
Cotton ball bunnies
Cotton balls were on sale, so we started playing with them, and here's what we came up with.
1. One cotton ball for the body
2. Pull another cotton ball in half. Split the bottom half into two and glue them on the bottom front of the body for front bottom legs. The other half is the head. Just pull up the ears a bit at the top and glue on to the top of the body.
3.Break off small pieces of a third cotton ball for the front paws, nose and tail and glue them on. We used tacky glue.
4. Lightly dab on eyes, whiskers, paws, and the middle of the ears with markers. To make eyes and other marks darker, keep dabbing.
They are cuddly Easter bunny friends!
Drawing a dinosaur: steps for children
1. Start with an oval for the body of your dinosaur.
2. From the oval draw a line up to the right for a long neck and part of the head.
3. Draw a second long line up under the first to finish the neck.
4. Connect the two neck lines with a half circle to form the head.
5. Draw a line off the back of the oval for the tail. Wind it around like a snake.
6. Draw another line off the back under the first.
7. Connect the end of the two tail lines.
8. Make a small circle at the front bottom of the oval. This will be part of the front leg. Make a larger circle at the back bottom of the oval. This will be the top part of the back leg.
9. Draw rectangles down from the two circles for the front and back legs closest to us.
10. Draw legs alongside the front and back legs for the legs on the other side of the dinosaur.
11. Trace the outside of the dinosaur with a non-toxic marker the color of your choice. Only trace the front of the circles with the marker. These become the top of the front and back legs closest to us.
12. Erase the pencil lines and your dinosaur is ready to color.
Friday, April 8, 2011
Easter basket made from woven paper
The first basket I made from two pieces of white paper and painted on eggs. The second I painted two pieces of white paper, one pink, and one blue because I didn't have colored paper. If you have color paper all the better!
First I folded the pink paper in half lengthwise.
Second I marked out 1 inch increments.
Third I cut 10 slits one inch apart on the markings. I stopped cutting one inch before getting to the top.
Forth I marked one inch increments across the width of the blue paper and cut down the length of the paper 6, one inch wide strips.
Fifth after opening up the pink paper, I wove the blue strips across lengthwise. Here's where the kids like to take over.
Sixth after all the strips were woven in, I glued the end of the strips to the side of the pink paper, so they didn't slip.
Seventh I gently folded the woven paper without creasing it, and cut two pieces of crape paper about arm's length. I used crape paper because we were all out of ribbon and yarn. One of my goals in this blog is to use what's in the house. The craft should be able to be done without running to the store for supplies, but I don't recommend crape paper. Ribbon or yarn would be much better.
Eighth I punched holes up both sides of the basket. I used a scissors which again I don't recommend but because of my own personal saga of buying hole punches that don't work, I turned to the scissors. I really recommend using a hole punch! ;)
Ninth I wrapped the end of the crape paper with tape to make it go through the holes easily. Then I started from the bottom bringing the taped point up and all the way through. I pulled the crape paper through almost to the end, and then tied a knot. Then I just sewed all the way to the top, did the same thing on the other side, and tied the ends of the leftover crape paper together to form the handle of the Easter basket.
Sewing up the sides is another favorite with kids. Of course you know your children best and what they are able to do, and what they need help with.
The bow was made from some strips of paper cut like those used to weave with, and then the end were taped together at the middle and to the basket.
Tuesday, April 5, 2011
Discovering color
If we experiment with combining new colors, it may inspire our children to do the same. They may even see that the sky, grass, and everything around them is made up of a mixtures of colors.
I colored in this dinosaur with five different colored crayons: two different greens, grey, blue, and purple. The sky has two shades of blue, orange, pink, and yellow in it.
Saving money on markers
To save money on markers, encourage children to outline with marker and color in with crayons. It's the coloring in that wears those non-toxic fun colored markers dry so fast.
In this picture, I drew my picture in pencil first. Then I outlined with markers, and colored in with crayon. I like the look. The marker makes the veins in the leaves stand out beautifully through the crayon.
I didn't erase all my pencil lines in this picture, but if you don't want them to show, erase them before coloring in the picture with crayons. Yes, the pencil lines do erase after you've traced them with marker. How easy!
Monday, April 4, 2011
Easter basket drawing with rectangles, and circles or ovals
Subscribe to:
Comments (Atom)


